Creating a beautiful design for a marketing project is only part of the printing process. Once created, the art files head to your preferred printer, where they will be proofed, plated, and printed. If your file isn’t properly prepared for production, it can lead to delays, added costs, or results that don’t match your expectations. As a business relying on printed materials to represent your brand, ensuring art files are print-ready is essential.
A print-ready file is a document formatted with the correct size, bleed, CMYK color mode, 300 DPI resolution, and embedded fonts so it can be printed without errors or delays.
At World Arts Printing, we work with our clients to make the printing process smooth and stress-free. Whether you’re submitting artwork for postcards, brochures, or business cards, understanding a few key requirements can help you achieve professional results the first time. This starts by avoiding the most common print file mistakes.
What Makes a File Print-Ready?
Before we consider the five common print file mistakes and how you can avoid them, it’s helpful to answer the question, what makes a file print-ready?
You make your files print-ready by having:
- Correct document size
- 0.125” bleed on all sides that trim
- CMYK color mode
- 300 dpi images
- Embedded or outlined fonts
- Proper margins (safe zone)
5 Common Print File Mistakes (and How to Avoid Them)
You want the artwork on your screen to be accurately reproduced on paper. A print-ready file accomplishes this mission. Proper file setup minimizes errors, reduces production delays, and guarantees a polished final product.
Let’s consider the benefits of submitting print-ready files, including:
- Accurate color reproduction using the correct color mode.
- Clean edge-to-edge printing with proper bleed settings.
- Sharp, professional images through high-resolution graphics.
- Consistent typography with embedded or outlined fonts.
- Faster turnaround times by avoiding revisions.
When you take a few extra steps during your design process, you can save time and money while ensuring your printed projects reflect your brand professionally.
Here are five mistakes to avoid when preparing your art files for your printer.
Mistake #1: Forgetting to Add Bleed
It is a common misconception that a printer can easily cut the page exactly on the line where your images or background colors stop (i.e., the final trim size). The bindery department is good, but even they need a little extra help to ensure your product finishes correctly, and you get the item you envisioned.
Enter bleed.
What is bleed?
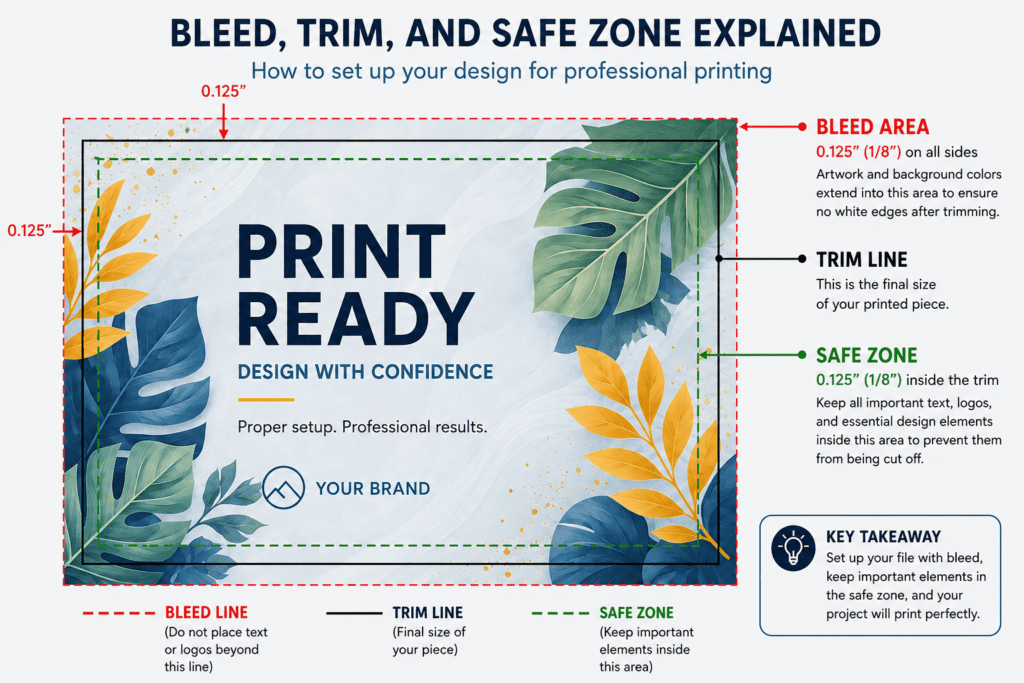
Bleed is the extra area that extends beyond the final trim size of your postcard, book page, or direct mail piece. Bleed is what ensures that your background colors or images print all the way to the edge after trimming. (See image below.)
How to avoid forgetting to add bleed:
- Set up your document with an additional 0.125 inches (⅛”) of bleed on all sides.
- Extend any background colors and images into the bleed area.
- Keep important text and logos within a safe zone of at least 0.125 inches inside the trim area.
It is important to note that without bleed, even slight shifts during trimming can leave unwanted white edges on your final piece. This can make your annual report or magazine look unprofessional.
Mistake #2: Using RGB Instead of CMYK
Understanding the difference between RGB and CMYK is essential for print accuracy. Your design software often defaults to RGB (Red, Green, and Blue) color mode, which is intended for digital screens, not large, commercial presses.
Printers use CMYK (Cyan, Magenta, Yellow, and Black) inks.
RGB vs CMYK – Why you should care:
- RGB colors can appear brighter on your screen than when they print.
- Converting your RGB files to CMYK at the last minute may lead to unexpected color shifts on your final product.
Best practices:
- Set your project to CMYK at the beginning of your design process.
- Use CMYK color values for your brand consistency.
Request a printed proof when color accuracy is critical.
Mistake #3: Using Low-Resolution Images
Images can tell stories that words sometimes do not. While they may look sharp on your screen, low resolution images may appear blurry or pixelated when printed.
How you can ensure high-quality images:
- Be sure your images have a resolution of at least 300 dpi.
- Avoid enlarging small images since it can reduce the quality.
- Use vector graphics for logos and illustrations whenever possible.
By using high-resolution images, your printed materials will look professional and stay consistent with your branding.
Mistake #4: Not Embedding Fonts
The quickest way to alter the appearance of your design is to not properly embed your fonts.
You can prevent font issues by:
- Embed the fonts when exporting your PDF, and
- Double-check that all word type appears correctly before submission.
Embedding fonts helps keep typography exactly as intended.
Mistake #5: Ignoring the Safe Zone
No one wants to spends hours on a design only to learn that the essential elements were cut off. Create a safe zone by keeping all essential text, logos, and important graphics that need to be kept well away from the trimming area.
Keep these safe zone guidelines in mind as you create your design:
- Keep all critical elements at least 0.125 inches inside the trim edge.
- Avoid placing text or logos too close to the edge.
- Use guides in your preferred design software to maintain proper spacing.
Maintaining the safe zone helps make your final printed piece look clean and professional.
How to Export a Print-Ready PDF (a Quick Checklist)
Once your design is complete and you have ensured that you haven’t made any of the five common mistakes, it is time to export your file in the correct format.
Use this quick checklist for recommended export settings:
- File Format: PDF (preferably PDF/X-1a or PDF/X-4), which are industry-standard formats recommended by organizations like the International Organization for Standardization.
- Color Mode: CMYK
- Resolution: 300 dpi for all images
- Bleed: 0.125 inches on all sides
- Crop Marks: Included if requested by your printer
- Fonts: Embedded
- Layers: Flattened unless otherwise specified
Submitting a properly exported PDF helps streamline the commercial printing process and ensures predictable results.
Frequently Asked Questions
What is a print-ready file?
A print-ready file is a digital document that meets all technical requirements for professional printing, including correct dimensions, bleed, color mode, image resolution, and embedded fonts.
Why is CMYK better than RGB for printing?
CMYK reflects how ink is applied to paper, resulting in more accurate and predictable printed colors compared to RGB, which is designed for screens.
How much bleed should I add to my design?
Most printers, including World Arts Printing, recommend adding 0.125 inches (1/8″) of bleed on all sides of your document.
What resolution should images be for print?
Images should be at least 300 dpi at their final printed size to ensure clarity and sharpness.
Can World Arts Printing review my file before printing?
Yes! We can take a preprint file review to help ensure your artwork meets all necessary specifications.
Need Help with Your Next Print Project?
World Arts Printing is proud to support businesses with high-quality printing and personalized service. If you have questions about preparing your files or need assistance with your next project, our team is here to help.
Contact us today request a quote for your next print or direct mail project.